

After you sign up for a Mailgun account, you will need to add a subdomain to your domain name and configure your MX records for that subdomain. You can then create a new SMTP user account with password. With those account credentials, you can send emails through Mailgun’s SMTP server using server “smtp.mailgun.org” and ports 25, 587, or 465.
What is SMTP and what is the purpose?
As we use Gmail, Outlook, or another email program to send emails without thinking about it, SMTP is the protocol that makes sending those emails work. The Simple Mail Transfer Protocol or SMTP is a simple yet reliable internet protocol that directs how to send your email to its destination email. SMTP includes instructions how to connect and authenticate with the mail server, and how to store that email for later retrieval from the recipient’s email client, whether it’s POP or IMAP. Interestingly, SMTP actually only sends text but graphics and file, using mime types, that are converted into text so they can be sent within the email packet to its destination.
Mailgun API versus SMTP
Mailgun has created its own API to make sending emails from your website easier and more reliable. It can also give you more flexibility. If you have a WordPress website, you can install a plugin to allow you to utilize their API. In practice though, SMTP is often the better option. For example, with some hosting solutions like Cloudways, you can specify the SMTP service for the whole server allowing you to configure once for every website hosted on that server. For some websites, I’ve also had delivery issues using the API but using Mailgun’s SMTP server has worked fine.
Getting Started with Mailgun
With a starting plan of $0.80 per 1000 emails (at time of writing), Mailgun provides an easy way to reliably send email and provide email logging. If you are having issues with your website emails getting caught in spam filters, you should set up Mailgun to use with your website. Here’s how to do that.
- Sign up for their Flex account, entering your company and billing information.
- After your account is verified, you’ll next need to add your domain and DNS records. For this step, follow steps 2 and 3 on the WP Engine tutorial: https://wpengine.com/support/configuring-mailgun-for-wordpress/#2
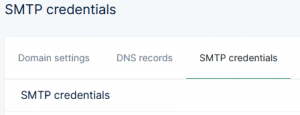
Skip the rest of their steps though since we’ll be using SMTP instead of the API. - Next, you’ll need to create your SMTP user account. Under the Sending menu in Mailgun, click on the Domain Settings option. Open the SMTP credentials tab. Here, click on the “New SMTP User” button and proceed to create your login and password. Record these credentials.

- Finally, you’ll need to set up Mailgun on your website, which will be different depending on your platform.
Using Mailgun with WordPress
Configuring your WordPress website to use Mailgun is easy, with several great plugins that you can use. Although Mailgun has their own Mailgun for WordPress plugin, I prefer Post SMTP Mailer/Email Log since it has more options and robust logging. WP Mail SMTP by WPForms is also a good option.
After installing and activating Post SMTP Mailer/Email Log, you’ll see a new “Post SMTP” option added to your left admin menu.
- Click on Start the Wizard
- Enter your ‘From’ email address and name. For better deliverability, use an account that matches the domain name of the website.
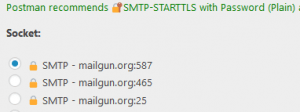
- For Outgoing Mail Server Hostname, enter “smtp.mailgun.org”.


- For sockets, you’ll see a couple of different options. Use port 587 for best security. If you wanted to use the Mailgun API, there’s an option for that here too.

- You’ll next need to enter the email address and password for your email account.
- On the next step, you can choose how to be notified in the case your email fails to be delivered.
- Next, you’ll want to test. Finish up the wizard and return to the main Post SMTP screen. Under Actions, select “Send a Test Email”. Follow the steps here to test your email setup.
Using Mailgun with Other Platforms
If you’re using a website platform other than WordPress, you’ll need to configure your outgoing email to use your SMTP settings. Consult documentation or your web developer if you need help.
- Use “smtp.mailgun.org” for your outgoing email server.
- For port, you can use either 587, 465, or 25 but 587 is recommended for better security.
- Enter your SMTP username and password.
In Summary
After you have Mailgun configured to send emails from your website, your emails will have a better success rate and you can view email logs at Mailgun.com to further diagnose email deliverability. It’s a great troubleshooting tool when an email recipient says they received an email since you can actually see if that email was delivered successfully to their inbox.